
Mud, mud, I love mud.
I'm absolutely, positively, wild about mud!I can't go around it, I've gotta go through it.
Beautiful, fabulous, super-duper mud!
If you're not familiar with the above little ditty you've probably never been camping nor were a member of a "scouting" organisation as a child. The song has been sung around many a campground fire and repeated with glee after numerous strong rainstorms.
I love mud. I love what can be done with mud... facial masks, pore cleansing, house building, children entertaining. Take some earth, simply add some water and it's amazing what you can accomplish with the resulting product.
Did you ever make MudPies as a child? Dirt in a pail, water added and served to loving, patient family members willing to pretend it's the yummiest dish they've ever consumed - what could be better?
How about serving them "mud" they'll actually want to eat?

Introducing "Mud" - a vegan chocolate dessert (free recipe!) from Mrs B bakes! It's a rich, velvety, sweet dish that's nothing like a mousse (no air), thicker than a custard or pudding and absolutely delicious!

Mud
1 (12.3 ounce/349 grams) package extra-firm silken tofu (I used an aseptic pack of long-life tofu called Blue Dragon) drained of excess liquid
1/4 plan milk replacement (I used oat milk but soya, almond, rice... would all work)
1 tbsp Simple Sugar Syrup (recipe follows) or 2 tbsp agave nectar or maple syrup
1 tsp vanilla extract
300 grams (about a cup and a half) semisweet chocolate chips
Break up tofu into a food processor. Add the milk, sweetening syrup and vanilla. Puree until completely smooth.
Bring a small saucepan half-filled with water to a boil and reduce heat to low. Place a metal bowl over the saucepan while it's simmering (not a rolling boil). Put chocolate chips in warming bowl and stir with a spatula while it melts. Once completely melted (no solid chips left) remove from heat (don't forget to turn off burner).
Scrape down the sides of your food processor, replace lid and turn on. Using the feeder tube, pour melted chocolate into the running food processor and blend until fully incorporated.
Using your spatula, transfer the mud into a bowl (or an airtight container) and cover with plastic wrap (see photos for a handy tip!) and chill. Mud is ready to eat after just an hour!
(Caution: Mud is not a pudding; it's much richer. Please keep that in mind when serving Mud as too much could overwhelm the palate.)

Instead of placing the plastic wrap over the rim of the bowl/container - lay it flat directly on top of the mud, creating an airless space between the mud and the plastic.
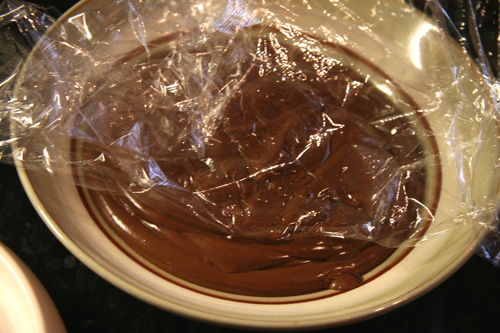
Push the plastic wrap to the outer edges of the mud and smooth to ensure no air is trapped between the mud and the plastic.

Curl/fold edges on top of centre inside the bowl, again to ensure no air contacts your mud.

These simple steps can help keep your puddings, custards and muds from getting a strange film across the top or simply drying out!
Simple Sugar Syrup
1 cup white sugar
1 cup water
Bring both to a boil in a saucepan (you may need to stir a bit to ensure sugar is completely dissolved) then remove from heat and allow to cool.
Store in refrigerator.
That's it! It's that simple (hence the name) and can be used to sweeten any number of things. Works especially well in cold beverages such as iced lattes, iced teas... it dissolves a lot faster/more easily than solid sugar granules so now that you've discovered it I'm sure you'll turn to it again and again!
Prepping for our photo shoot...


