Showing posts with label dessert. Show all posts

Friday, 27 October 2017

Low carb individual cheesecakes - a recipe

As more and more research is coming to light about the benefits of eating low-carb as part of a healthy-eating lifestyle, especially when linked to trying to conceive, I decided it was too simple a change not to make.

I had done Atkins years ago, immediately prior to conceiving my daughter, so I had some personal  knowledge that, at least, it won't hurt my chances and was comfortable that I'd be able to "handle" the changes necessary to eat significantly low-carb.

Since late July, I have been following a more-or-less Atkins approach to my dietary life and, after cheating only once (at a fantastic US-themed party in August) and ironing out some kinks (having too much fruit), my body has been responding quite positively and I have now lost more than 8.5 cm from my waist.

My journey isn't over, however, as I would like to be still significantly smaller than I currently am, but I can already feel the benefits (not least of which is gaining some semblance of confidence).

Now that I have made the change and done the hard work of "coming off of sugar" (for the skeptics, research proving sugar addiction exists linked here), I genuinely hope I can spend the rest of my life avoiding it altogether.* Luckily, I've always had more of a garlic-tooth than a sweet-tooth!

This doesn't mean, however, that I don't like the occasional sweet thing (hence the cheating at that party).

When trying to decide something of the dessert/sweet variety to revamp, my mind went immediately to the one thing, the only thing I had cheated with since starting this journey: Cheesecake.

The cheesecake I had at that fateful party was, in fact, Cheesecake Factory cheesecake and the recipe below doesn't compare to how that magical dessert tastes, but it's a place for me to start, a springboard off which I can launch further trials and experiments in trying to recreate the famous and specific flavours of the Cheesecake Factory cheesecake.

Without further ado:

Low-Carb Individual** Cheesecakes


Ingredients:

  • 450g cream cheese
  • 100g xylitol (or appropriate ratio of other sweetener)
  • 1 1/2  tbsp almond flour
  • Pinch of salt
  • 3/4  tsp vanilla extract
  • 2 tsp lemon juice
  • 2 large eggs
  • 140 ml crème fraîche

Method:

  • Preheat the oven to fan  200C. 
  • Using a hand mixer, beat the cream cheese at medium-low speed until creamy (about 2 minutes). With the mixer on low, gradually add the sugar, then the flour and salt, being careful to scrape down the sides of the bowl occasionally to ensure the mixture is fully incorporated. 
  • Add the vanilla, lemon juice. 
  • Whisk in the eggs, one at a time, scraping the bowl to ensure everything is properly blended. 
  • Add the crème fraîche.
  • Whisk to blend but do not over-work the filling.
  • Pour filling into 8 ramekins. 
  • Place ramekins on a baking sheet and put them into the oven.
  • Bake for 5 minutes. 
  • Reduce oven temperature to fan 90C and bake for 15 minutes more. If you gently shake the baking tray, the filling should have a slight wobble. 
  • Turn off the oven and open the oven door for a cheesecake that's creamy in the centre, or leave it closed if you prefer a drier texture. Let cool completely in the oven.
  • Refrigerate overnight for best flavour/texture.


I originally made this both with and without a base and both turned out delicious, but because the base I chose is actually a shortbread, it wasn't quite the same as what I as used to so I preferred the cheesecakes without. The shortbread I used for a base. I hope to eventually develop something closer to the Cheesecake Factory base.

*Before I have reached my goal size, I plan on thoroughly investigating the "Keto" way of eating and, considering the results of that research, may switch to that for the maintenance phase of life.

**Due to unforeseen circumstances, our kitchen is without some large appliances - namely, an oven and hob, both of which were gas-powered. Because of this, I made these in a small batch in my toaster oven. If you would like to make a full-size cheesecake, I recommend you:

  • Double everything above 
  • Brush the sides of a springform tin with melted butter and put on a baking sheet. 
  • Pour in the cheesecake filling 
  • Bake for 10 minutes. 
  • Reduce oven temperature to fan 90C fan and bake for 25 minutes more. (Gently shaking the tin should give the filling a slight wobble.)
  • Turn off the oven and open the oven door for a cheesecake that's creamy in the centre, or leave it closed if you prefer a drier texture. 
  • Let cool in the oven for 2 hours. The cheesecake may get a slight crack on top as it cools.

  • Refrigerate overnight.


Monday, 14 February 2011

Lots of love and a personal challenge for 2011

MrB and I don't celebrate St Valentine's Day in any formal, traditional way. (Several years ago I told MrB that if he were to send me flowers at my office that year he'd then be off the hook for the rest of our Valentine's Days together. He sent gorgeous balloons instead, one even being a giant frog, and he was very definitely off the hook.) Instead we celebrate the anniversary of a special day in our shared history on the 13th of February each year and treat the 14th as any other day of the year, specifically trying to avoid the commercialism that surrounds it 'nowadays.


Today, though, I thought I'd share a recipe I created last month and hey! I made it heart-shaped!


Happy Valentine's Day!


Almond Cookie-Press Cookies


1 cup dairy-free margarine at room temperature (plus some for buttering baking trays)
1/2 cup vegan cream cheese
1 cup granulated/castor sugar
3 cups plain flour
1/4 teaspoon salt
1/2 teaspoon vanilla extract
1 1/2 teaspoons almond extract
1/4 teaspoon baking powder


Fully combine margarine and cream cheese in a medium bowl. Add sugar and cream together.


Add salt, baking powder, vanilla and almond and blend well.


"Butter" (read: coat with a thin layer of dairy-free margarine) several baking trays (this recipe makes a LOT of cookies and I forgot to count how many but I'd comfortably guess it's more than 40!) before you start pressing your cookies. I was making cookie-press cookies based on recipes/videos I'd found online and when they recommended buttering your trays before you start; I though I'd be fine to just use baking paper. Boy, was that a silly move! The cookies won't stick to the baking paper which means they won't pull away from the cookie-press which means you're pressing cookies for no good reason. Please, people, learn from my mistakes! *grin*


Using a flexible spatula, fill cookie-press with dough and choose your shape disc. I chose the disc for making heart shapes (largely because I couldn't figure out which discs made which shapes) and away I went. My cookie-press has two cookie-thickness settings so I chose to use the thinner cookie setting and I pressed once for each cookie as I wanted them to be little morsels rather than "cookies", if that makes sense.


I then baked the cookies at 200C/350F for about 8 minutes. Too much longer and they started to colour. I wanted them to just be set with a hint of goldenness.


Allow to cool on baking tray for at least 10 minutes, remove to rack to cool completely.


I can't wait to use my cookie-press again! This time I might have to use each shape disc just to see what each produces!


~~~~~~~~~~~~~~~~~~~~~~~~~~~~~~~~~~~~~~~~~~~~~~~~~~


I'm on a self-induced (though inspired by futuregirl's*) craft diet this year.... A Challenge, if you will, to use what I have rather than buying more and more and making less and less.


What follows are photographic evidence of why I need to make this commitment to myself, to my bank balance, to the world (- why am I such a consumer?!) but please don't judge me too harshly... I do need to organise the whole set-up (that's on my list and it starts with filing about 45 years worth of paperwork) - and get a desk chair - but I know I've got at least a year's worth of crafting in there!


Want to know the worst part?.... That's not even any of my yarn in there! There's more *gasp* in other rooms in the house (living room, closet in the bedroom, etc)!


So, I've got a list longer than I am tall of things I want to make this year with the supplies I have so I now just need to get the motivation to actually do something other than brainstorming and dreaming and coveting!


Did you know that this is the first year in three years that I haven't been to my favourite two yarn stores in London to splurge on the Rowan Yarns sales? One of these retailers reported a drop in January sales as compared to the previous two years. *sigh* I know it's not all down to me but it brings home just how much I'd been spending on craft items and not getting many, if any, craft Finished Objects out of those items.


Have you set yourself a personal challenge for 2011?


*If you get the chance, peruse futuregirl's blog a bit... She's a Crochet Badass and totally inspirational for all "makers" out there.

Thursday, 18 November 2010

Introducing "Mud" - a vegan chocolate dessert


Mud, mud, I love mud.
I'm absolutely, positively, wild about mud!

I can't go around it, I've gotta go through it.

Beautiful, fabulous, super-duper mud!


If you're not familiar with the above little ditty you've probably never been camping nor were a member of a "scouting" organisation as a child. The song has been sung around many a campground fire and repeated with glee after numerous strong rainstorms.


I love mud. I love what can be done with mud... facial masks, pore cleansing, house building, children entertaining. Take some earth, simply add some water and it's amazing what you can accomplish with the resulting product.


Did you ever make MudPies as a child? Dirt in a pail, water added and served to loving, patient family members willing to pretend it's the yummiest dish they've ever consumed - what could be better?


How about serving them "mud" they'll actually want to eat?


Introducing "Mud" - a vegan chocolate dessert (free recipe!) from Mrs B bakes! It's a rich, velvety, sweet dish that's nothing like a mousse (no air), thicker than a custard or pudding and absolutely delicious!


Mud


1 (12.3 ounce/349 grams) package extra-firm silken tofu (I used an aseptic pack of long-life tofu called Blue Dragon) drained of excess liquid
1/4 plan milk replacement (I used oat milk but soya, almond, rice... would all work)
1 tbsp Simple Sugar Syrup (recipe follows) or 2 tbsp agave nectar or maple syrup
1 tsp vanilla extract
300 grams (about a cup and a half) semisweet chocolate chips


Break up tofu into a food processor. Add the milk, sweetening syrup and vanilla. Puree until completely smooth.


Bring a small saucepan half-filled with water to a boil and reduce heat to low. Place a metal bowl over the saucepan while it's simmering (not a rolling boil). Put chocolate chips in warming bowl and stir with a spatula while it melts. Once completely melted (no solid chips left) remove from heat (don't forget to turn off burner).


Scrape down the sides of your food processor, replace lid and turn on. Using the feeder tube, pour melted chocolate into the running food processor and blend until fully incorporated.


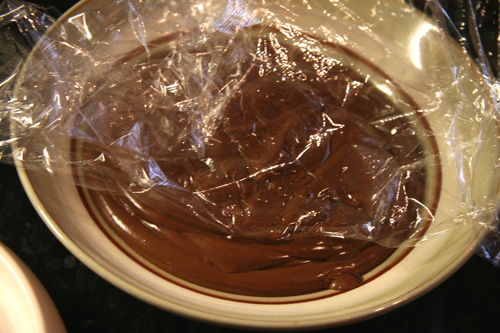
Using your spatula, transfer the mud into a bowl (or an airtight container) and cover with plastic wrap (see photos for a handy tip!) and chill. Mud is ready to eat after just an hour!


(Caution: Mud is not a pudding; it's much richer. Please keep that in mind when serving Mud as too much could overwhelm the palate.)


Instead of placing the plastic wrap over the rim of the bowl/container - lay it flat directly on top of the mud, creating an airless space between the mud and the plastic.


Push the plastic wrap to the outer edges of the mud and smooth to ensure no air is trapped between the mud and the plastic.


Curl/fold edges on top of centre inside the bowl, again to ensure no air contacts your mud.
These simple steps can help keep your puddings, custards and muds from getting a strange film across the top or simply drying out!


Simple Sugar Syrup


1 cup white sugar
1 cup water


Bring both to a boil in a saucepan (you may need to stir a bit to ensure sugar is completely dissolved) then remove from heat and allow to cool.


Store in refrigerator.


That's it! It's that simple (hence the name) and can be used to sweeten any number of things. Works especially well in cold beverages such as iced lattes, iced teas... it dissolves a lot faster/more easily than solid sugar granules so now that you've discovered it I'm sure you'll turn to it again and again!


Prepping for our photo shoot...


Friday, 15 October 2010

Laundry "spiders", cookies and other life detours...

When I started this blog it was with the intention of showing you, dear readers, what it is that I love to do and how that love affects my daily choices, especially regarding my eating habits.

What I love to do is bake. I love to bake vegan sweet goodies that people are surprised about and utterly melt over.

This blog isn't very old and yet I already have a plethora of tags that aren't at all related to baking. This, for me, is a bit annoying but completely not surprising. I've always had many "layers" in my life and having begun to share more of them here seems, now, like a natural progression.

I'm sorry if you came here wanting only vegan goodies (sweet or savoury) and aren't that entertained by the rest of me. I wish you well on your own personal journey but this is a journey that I must make and, therefore, am taking the wheel and consciously deciding that it shall be reflected in this blog. All the layers. All the Me-s I have to offer.

If you don't mind and/or enjoy seeing more of my layers; welcome! We're in for a strange and wondrous trip, indeed!

Since it's been so long since I last posted I have a few things I'd like to share today so stay tuned or tune out. Either way I've numbered them so you can skip topics (or refer back to them) as you like....

1. Laundry "Spiders"

I have long hair. Very long hair by some standards, though it's not yet as long as I'd like it (and yet, simultaneously, I wish I could sport a chic, shorter style that better befits my physical age but alas, the build of my body makes longer hair aesthetically necessary *sigh*).

Because I have long hair I end up with it everywhere. On the floors, in the shower drain, on MrB's back as he's leaving for work, worked into a knitting or crochet project. That part's a nuisance, certainly, but OK as they're in small numbers and easily contained and removed.

What utterly annoys me, however, is the little balls of hair that I find in the laundry. Every. Single. Time.

I call them Laundry Spiders and toss away several of them every time I do a wash. (The record for one load is 7. SEVEN! from one load of mostly socks.)

Am I the only one who gets these?? Surely I can't be!

What do you call them?

Do you have any hints, tips, tricks for getting rid of them? I'd LOVE to know!

2. Baking

And now for something you may or may not have been waiting for. My original Chocolate Chip Cookie recipe.

///
Vegan Chocolate Chip Cookies

1cup dairy-free margarine, at room temp
1 1/4 cups sugar
1 tablespoon plus 1 teaspoon molasses
2 teaspoons vanilla extract (when I mix it up a little I use 1 teaspoon vanilla and one teaspoon almond)
2 1/2 cups all-purpose/plain flour
1 teaspoon baking soda
1 teaspoon salt
2 cups semi-sweet chocolate chips (or vegan carob chips)
3/4cup vanilla soy yogurt

Preheat oven to 350 F

Cream the margarine and sugar with a hand mixer until fluffy

Add the molasses and vanilla and incorporate. Add the dry ingredients to this mixture and mix until a dough forms. Fold the chocolate chips into the dough.

Drop by tablespoons onto ungreased cookie sheets or an ungreased, unlined cupcake tin. Bake for 8 to 10 minutes (my oven is -definitely- 8 minutes) until lightly browned. (Two notes: Due to their vegan status and chemistry, the cookies will not spread as much as normal cookies but that's good! Also, Don't worry about under cooking them as there's no raw eggs to worry about, though, the 8-10 minute rule, for me, leaves a cookie that's gently soft-crunchy on the outside and wonderfully soft and gooey on the inside!)

Allow to cool on baking sheets for 5 minutes then transfer to cooling rack. (At this point baking sheets can be rinsed under cold water to prepare them for the next batch.)
///

I know there are a ton of other good, vegan chocolate chip cookie recipes out there and respect that they are probably very good. I only decided to invent my own recipe when I realised that most of the better recipes which yield a softer cookie contain flaxseeds/linseed and I know a lot of people have seed allergies so wanted to avoid them if I could.

If/when you make these, please do let me know what you thought of the recipe. I live for feedback and won't necessarily know I need to change something unless you tell me. Yes, you.

3. Life

Just recently (last Thursday, to be exact) I went to see a psychiatrist who has diagnosed me with Adult (Inattentive) Attention Deficit Disorder and my life has been quite strange since that moment.

I went to him thinking I had it or something akin to it (Would it really be me if I had gone to a doctor without investigating the jeepers out of something first?! I thought not.) but when he confirmed that I do, indeed, have it I can't accurately describe what I was thinking or feeling.

There was some relief, some disbelief, some shame, some anger, some fear, some impatience... gosh, the list is virtually endless.

At the suggestion of a dear friend I purchased some books by Edward M. Hallowell (Driven to Distraction and Driven from Distraction - both can be purchased from Amazon.com/.co.uk) and from what I've read so far I truly believe my life will change for the better with this diagnosis. I'm almost through the first book and it's almost as though this book was written specifically for me. Mr. Hallowell certainly seems to understand the condition (as he well should, he suffers, too).

I'm sure there will be a lot more written on this blog about ADD in the future so I'm going to stop here now that I've introduced it.

4. AOB

Stay tuned because in the next few days I'll be introducing a Tomato "Soup" recipe!

Monday, 16 August 2010

A lesson in failure...

I want to let you all know that it's not always sunshine and roses in Mrs B's kitchen.

I don't always perform feats of culinary mastery. More often than not I'm flying by the seat of my pants/trousers and if there's a good result... Bonus! but sometimes (a lot of the time) there are mistakes, mis-read recipes, ovens left unattended or forgotten.

That kind of thing, admittedly, doesn't happen often. Most of the time the little fairies in my oven work wonderful magic and I pass it off as my own "hard work" after lots of praying "please work please work please work" and doing a little jig in front of the oven door.

I do make mistakes, though, and here's proof...

I read an idea on The Interwebs the other day that Bananas make really good vegan ice cream... if you freeze them whole, then put them straight into the food processor/blender, they contain just enough freeze and self-binding that that's all you need to do. Freeze, scramble, eat.

Simple enough, right? So, I froze some bananas....

And then I tried to peel them. But peeling them from frozen seemed rather tricky so I jumped back to The Interwebs and did a search for "peeling frozen bananas".... And it would seem that I'm an ass. Did you know that you should Peel. Them. First.!? Neither did I! So, all those brown, ugly, useless rocks were composted and I did this...

That seems so much more sane... with the benefit of hindsight. - I'll be making Banana Ice Cream soon (once I get over the self-humiliation of The Frozen Banana Peel Incident) and I'll let you know how what I thought of it when I do.

I decided, then, that it was time for a success in Mrs B's kitchen, so I did this...

I soaked some haricort beans so I could make some vegan Boston Baked Beans using this recipe.

This is what I got after 7 hours in the crock pot...

Nasty, no? See how they're all black/brown and there's almost no water/moisture? Not like Boston Baked Beans at all! So, why didn't the recipe tell me to add water?? What did I miss?? I went back to the recipe and scrutinised it...

When I made the recipe I read the ingredients and the bit about cooking them in the crockpot rather than the oven. This means I skipped the instructions that weren't relative (as far as I could see) to the method I planned to use. I read "Boil the soaked beans for 30 minutes, as directed above. Then, instead of combining everything in a casserole, combine them in the crock pot instead" which, to me, means that I add everything that's in the ingredient list, right?

No, as it happens. I'm a dumbass. There are instructions for both cooking methods in the first paragraph. How many times have I read a knitting pattern, a sewing pattern, a crochet pattern through All. The. Way. to make sure I understood everything?? Too many to count. There is supposed to be water added. Now I know.

And "knowing" is half the battle.

So, here I am, two failures under my belt in the same day. Argh.

What do I do? Do I admit defeat and call the day a wash? Start again tomorrow?

Hell no! I start again straight away, salvage some of my cook-esteem, redeem myself in the eyes of.... myself.

I made this little beauty...

Apple Tosca

And here's how... (non-Vegan advice can be found at the end of the post)

Preheat your oven to 200C (just under 400F)

While your oven is heating, slice 4 medium-sized apples and spread over a baking pan (for this amount, I find a pie plate is a sufficient size) and put in the oven so that the apples have a chance to cook and soften a little while you're preparing the top.

Now, in a saucepan over low heat, combine the following:

75 grams (1/3cup) milk-free margarine

75 ml (just under 1/3cup) sugar

2 tablespoons agave nectar (I used less because of the ice cream) you could also use maple syrup or corn syrup

2 tablespoons cream (I had oat cream but decided to use soy ice cream)

200 ml (just under 1cup) oats

75 ml (1/3cup) flour

1/4 tsp cinnamon (optional. I didn't add it this time)

When everything is melted and mixed well together: take the apples out of the oven. Pour (scoop) the oatmeal mixture over the apples and spread evenly.

Bake for 20 minutes.

It should look something like this (if you omit the cinnamon. If you use cinnamon it will look like this but speckly)...
Pretty, isn't it? It tastes even yummier than it looks!

Here's mine with soy custard...
And Mr B's with soy vanilla ice cream...

So, to come we have Boston Baked Beans, the Redux and Banana Ice Cream, also a Redux. Let's hope these incarnations go a little more smoothly! I don't think my cook-esteem could take another blow this week! *grins*

Apple Tosca comes from a family favourite that's totally not vegan so feel free to use normal margarine, cream (or ice cream) and honey as to your heart's content. My family loves each version equally as *whispers* they can't tell the difference! ;)